How to Install and Maintain an ESTEL 48V Telecom Rectifier


An ESTEL telecom rectifier 48V plays a vital role in powering telecom rectifier systems. It converts alternating current (AC) to stable direct current (DC), ensuring uninterrupted operation for critical telecom equipment. Proper installation of the telecom rectifier 48V prevents power issues, while routine maintenance maximizes its lifespan. You must understand the steps to install and maintain the telecom rectifier 48V efficiently. By doing so, you ensure reliable performance and reduce the risk of downtime in your telecom network.
Key Takeaways
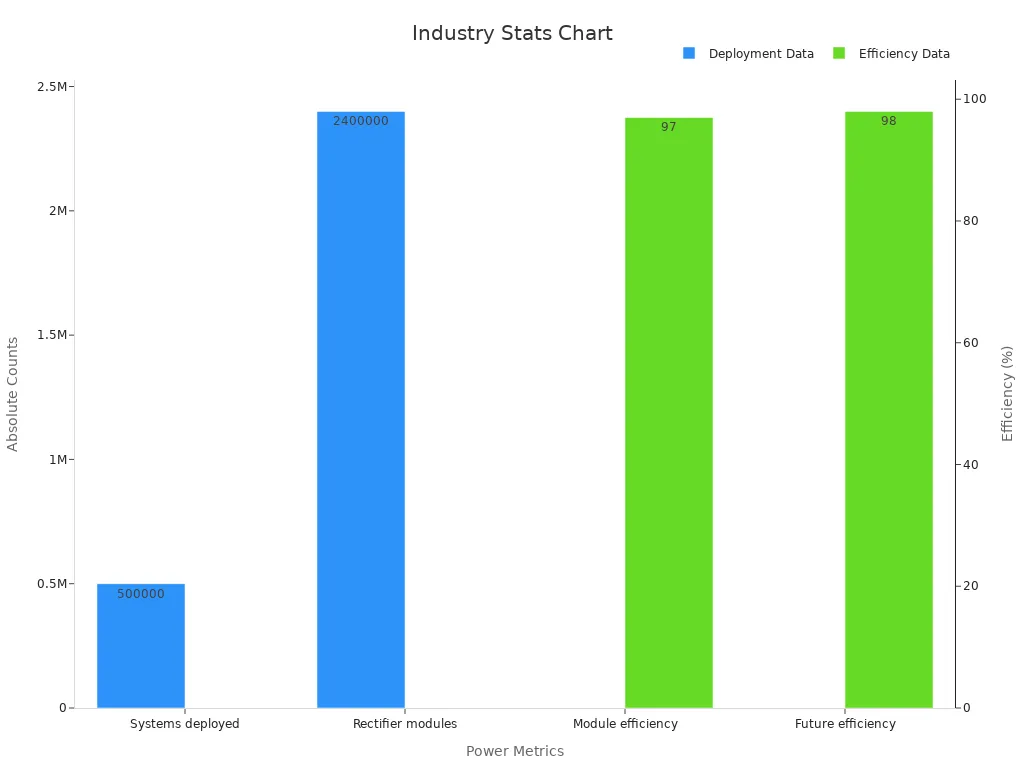
Add up the power your telecom devices need before setup. This makes sure the rectifier can handle the load safely.
Pick a rectifier that follows safety rules and works well. This avoids trouble and keeps it running smoothly.
Clean and check the rectifier often to keep it working well. Do this every three to six months to spot problems early.
Watch your battery health carefully. Test voltage and discharge to make sure they work during power outages.
Update the firmware often for better performance and safety. Updates help the rectifier run better and last longer.
Assessing Power Requirements
Calculating Load and Redundancy
Before installing an ESTEL 48V telecom rectifier, you need to calculate the power requirements of your telecom power systems. Start by identifying the total load of all connected devices. Add up the power consumption of each device to determine the total load in watts. This ensures the rectifier can handle the demand without overloading.
Redundancy is equally important. It provides backup power in case of a rectifier failure. For example, if your system requires 2,000 watts, consider installing a rectifier with a capacity of 3,000 watts. This extra capacity ensures uninterrupted operation during maintenance or unexpected failures.
The telecom power systems market is growing rapidly, with a valuation of USD 4.86 billion in 2023. It is projected to reach USD 36.72 billion by 2032. This growth highlights the increasing demand for reliable rectifiers and the importance of accurate power assessments.
Ensuring Compatibility with Telecom Infrastructure
Compatibility between the rectifier and your telecom infrastructure is critical. Check the technical specifications of the rectifier to ensure it meets industry standards. For instance, transient-voltage protection safeguards against power surges, while electromagnetic compatibility prevents interference with other devices.
Specification | Description |
|---|---|
Transient-Voltage Protection | Protects against power surges, following EN61000-4-5 and EN41003 standards. |
Electromagnetic Compatibility | Meets EN55022 rules to avoid interference with other devices. |
Safety Standards | Follows EN60950 and UL950 for safe operation and proper isolation. |
These standards ensure the rectifier operates safely and integrates seamlessly with your existing setup. Always verify that the rectifier supports the voltage and current levels required by your system. This step prevents compatibility issues and ensures efficient operation.
Selecting Equipment for Installation
Choosing the Right Telecom Rectifier 48V Model
Selecting the correct telecom rectifier 48V model is crucial for ensuring reliable power delivery. You should evaluate several factors before making a decision:
Power Requirements: Match the rectifier's capacity to the power needs of your telecom equipment. This ensures a stable DC power supply without overloading the system.
Environmental Conditions: Choose a rectifier designed to perform well in harsh environments. Models with robust enclosures and wide operating temperature ranges are ideal for outdoor or industrial setups.
Manufacturer Reputation: Opt for rectifiers from trusted manufacturers known for efficiency and reliability. These companies often provide better warranties and customer support.
By considering these factors, you can select a rectifier that meets your system's demands and operates efficiently under various conditions.
Selecting Batteries and PDUs
Batteries and Power Distribution Units (PDUs) are essential components of your telecom power system. When choosing batteries, focus on reliability and durability. Key considerations include:
Capacity: Ensure the battery can handle your system's backup power needs.
Voltage: Match the battery's voltage to the rectifier's output.
Battery Chemistry: Decide between VRLA (Valve-Regulated Lead-Acid) or Lithium-ion batteries based on your budget and performance requirements.
Runtime Requirements: Select batteries that can sustain operations during outages.
For PDUs, prioritize models that meet your load requirements. Look for features like voltage distribution and monitoring capabilities to enhance system performance.
Verifying Compliance with Standards
Compliance with industry standards ensures safety and compatibility. Verify that the rectifier, batteries, and PDUs meet the following benchmarks:
Component | Key Standards |
|---|---|
Rectifier | EN61000-4-5 (transient-voltage protection), EN55022 (electromagnetic compatibility) |
Batteries | IEC 60896 (VRLA batteries), UL 1973 (Lithium-ion batteries) |
PDUs | IEC 60950 (safety standards), EN 62368-1 (voltage distribution compliance) |
Adhering to these standards minimizes risks and ensures seamless integration into your telecom infrastructure. Always confirm certifications before purchasing equipment.
Planning Installation Layout
Allocating Space and Cable Routing
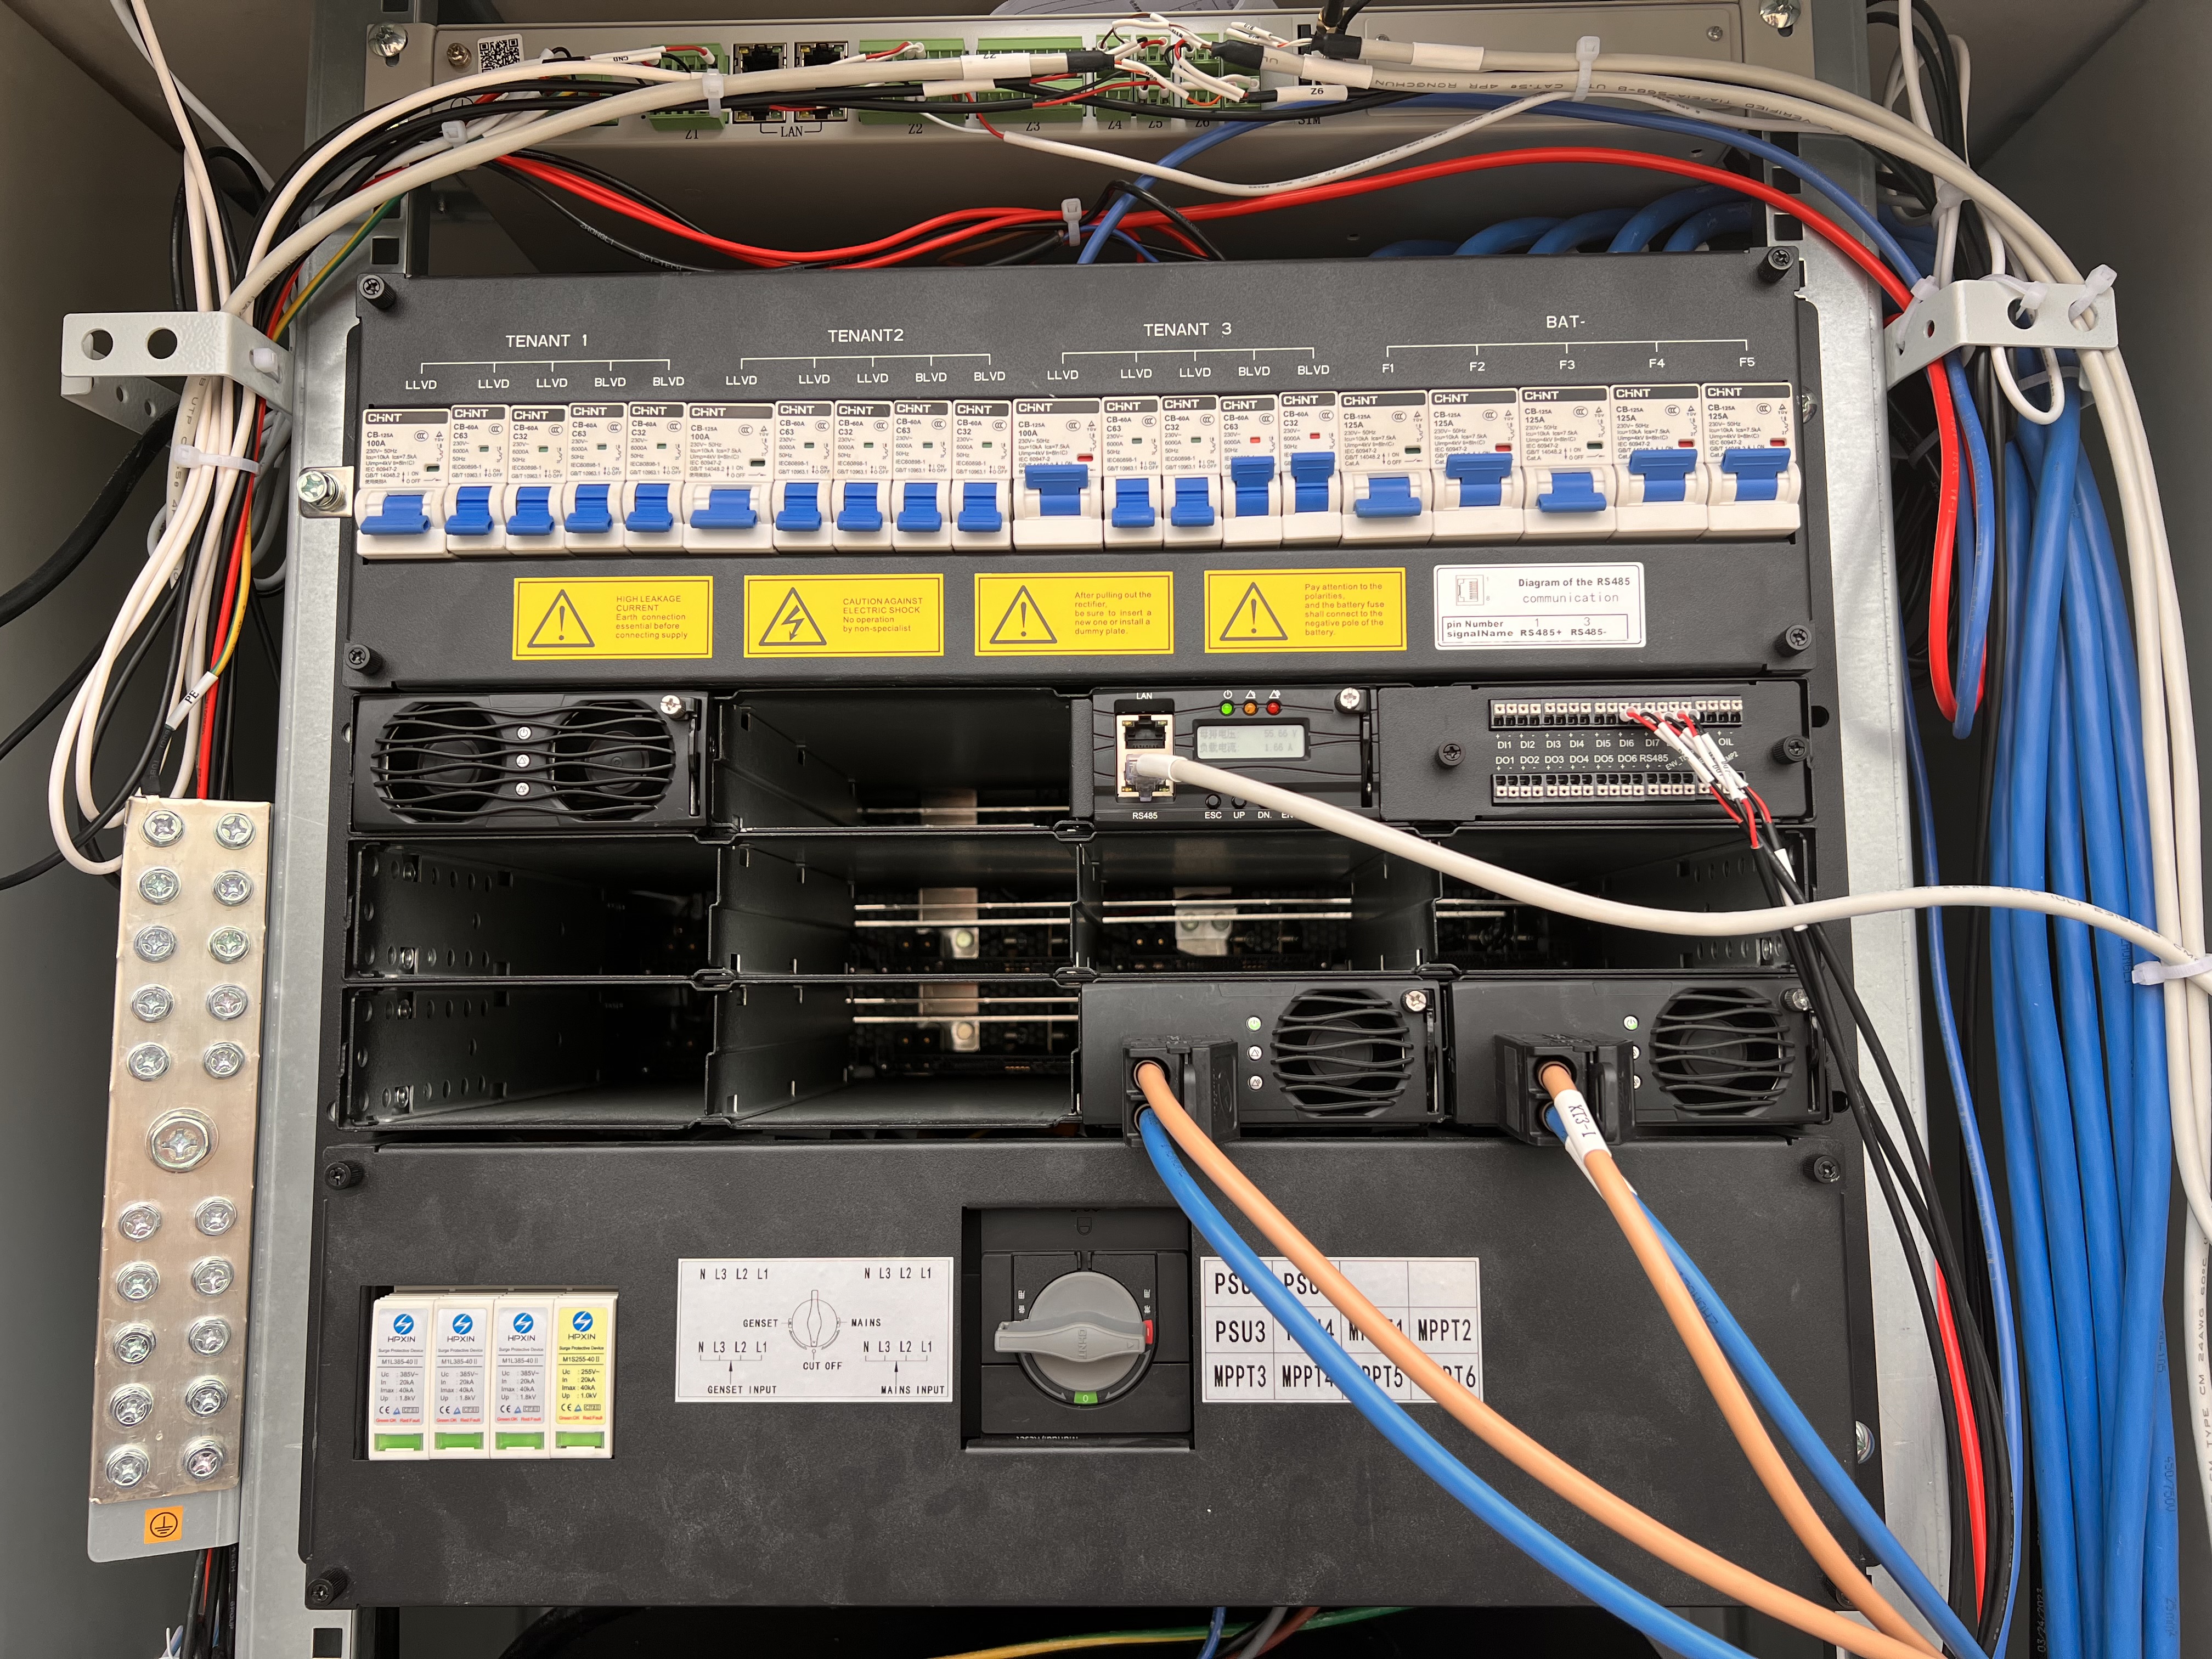
Proper space allocation and cable routing are essential for an efficient and safe installation. Start by organizing your equipment layout. Place the rectifier module at the top of the cabinet to enhance heat dissipation. Use separate compartments for batteries and equipment to prevent overheating and maintain stability. Reserve adequate space for communication devices within the equipment compartment.
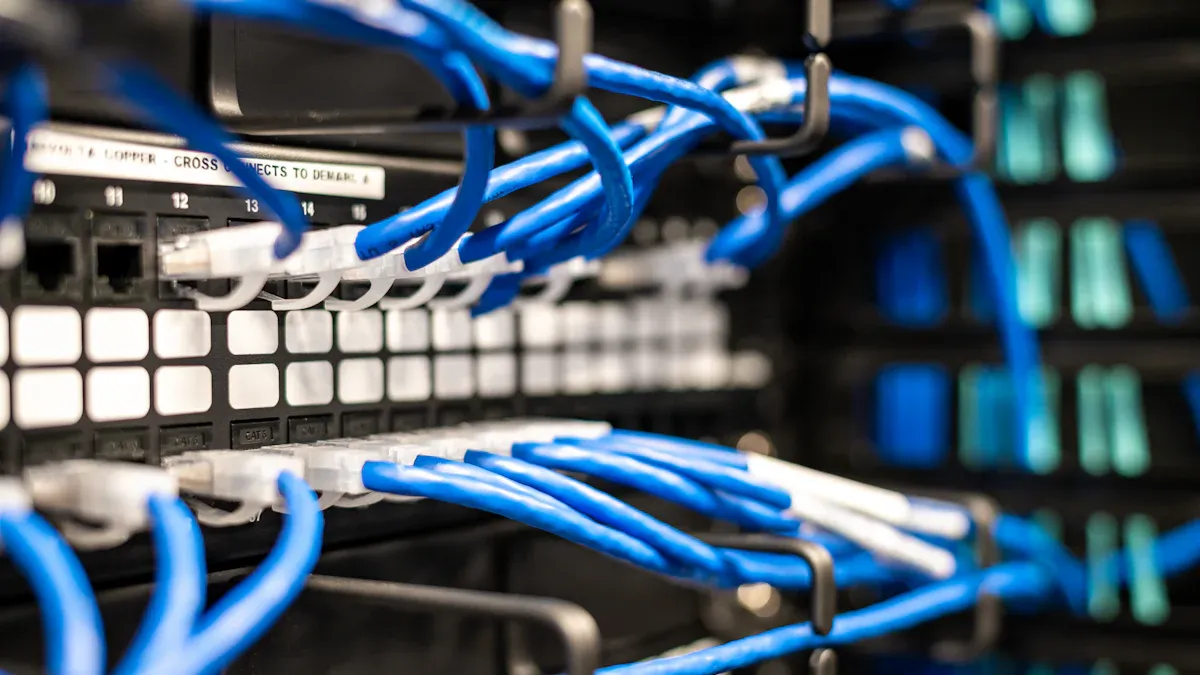
When planning cable routing, prioritize simplicity and accessibility. Route cables neatly to avoid tangling and interference. Label each cable to simplify future maintenance. Ensure the power distribution units (PDUs) are designed for easy access and modularity. This approach allows you to adapt to changing power requirements without disrupting the entire system.
Key considerations for layout planning:
Position the rectifier module at the top for better cooling.
Use separate compartments for batteries and equipment.
Design PDUs for easy maintenance and modularity.
Reserve space for communication equipment.
Ensuring Proper Grounding
Grounding protects your telecom system from electrical faults and surges. Install a dedicated grounding bar within the cabinet. Connect all equipment, including the rectifier and batteries, to this bar using appropriate grounding wires. Verify that the grounding system complies with industry standards to ensure safety and reliability.
Inspect the grounding connections regularly. Loose or corroded connections can compromise the system's safety. Use a multimeter to check the continuity of the grounding system. This proactive approach minimizes risks and ensures uninterrupted operation.
Preparing for Airflow and Cooling
Effective cooling prevents overheating and extends the lifespan of your equipment. Incorporate both active and passive cooling methods into your layout. Fan cooling actively circulates air, while passive ventilation systems allow natural airflow. For controlled environments, consider installing air conditioning units to maintain optimal temperatures.
Feature | Importance |
|---|---|
Fan cooling | Prevents overheating by actively circulating air. |
Passive ventilation systems | Allows for natural airflow, reducing reliance on mechanical systems. |
Air conditioning units | Provides controlled cooling to maintain optimal temperature levels. |
Adequate airflow management | Essential for effective heat dissipation and equipment longevity. |
Ensure that airflow paths remain unobstructed. Avoid placing equipment too close to walls or other obstructions. Proper airflow management is critical for maintaining system efficiency and reliability.
Step-by-Step Installation Guide
Inspecting and Unpacking the Rectifier
Before starting the installation, inspect the rectifier thoroughly. Check the packaging for any signs of damage during transit. A damaged package could indicate potential issues with the equipment inside. Once you confirm the packaging is intact, carefully unpack the rectifier and its accessories. Use the manufacturer's checklist to ensure all components are present. Missing parts can delay the installation process.
Examine the rectifier for visible defects, such as dents or loose connections. Pay close attention to the connectors and terminals. These components must be in perfect condition to ensure proper operation. If you notice any issues, contact the supplier immediately for a replacement or repair.
Tip: Keep the user manual handy during this step. It provides detailed guidance on inspecting and handling the rectifier safely.
Mounting and Wiring the Rectifier
Mounting the rectifier requires precision and adherence to safety guidelines. Begin by selecting a stable and secure location within the telecom cabinet. Use the mounting brackets provided by the manufacturer to fix the rectifier in place. Ensure the unit is level and tightly secured to prevent vibrations or movement during operation.
Next, proceed with wiring the rectifier. Start by connecting the input AC power cables to the designated terminals. Follow the color-coded wiring diagram in the user manual to avoid errors. Then, connect the output DC cables to the telecom equipment and batteries. Use cables with appropriate gauge sizes to handle the current load safely.
Double-check all connections to ensure they are tight and free from corrosion. Loose or faulty connections can lead to power interruptions or equipment damage. Use cable ties to organize the wires neatly and prevent tangling.
Note: Always turn off the power supply before handling any electrical connections. This precaution minimizes the risk of electric shock.
Configuring Settings and Testing
After mounting and wiring, configure the rectifier settings to match your system's requirements. Access the control panel or interface to adjust parameters such as output voltage, current limits, and alarm thresholds. Refer to the user manual for step-by-step instructions on navigating the settings menu.
Once the configuration is complete, test the rectifier to ensure it operates correctly. Power on the unit and monitor the output voltage and current using a multimeter. Verify that the readings match the configured settings. Check for any error messages or alarms on the display panel. If you encounter issues, consult the troubleshooting section of the manual.
Finally, conduct a load test by connecting the rectifier to your telecom equipment. Observe its performance under normal operating conditions. Ensure the system remains stable and delivers uninterrupted power. This step confirms the rectifier is ready for use.
Reminder: Document the configuration settings and test results for future reference. This record will be helpful during maintenance or troubleshooting.
Rectifier Module Maintenance Practices
Regular maintenance of your rectifier ensures optimal performance and extends its lifespan. By following these practices, you can prevent unexpected failures and maintain a reliable power supply for your telecom systems.
Cleaning and Inspecting Components
Dust and debris can accumulate on your rectifier over time, reducing its efficiency and causing overheating. Cleaning the components regularly helps maintain proper airflow and prevents damage. Use a soft, dry cloth or an anti-static brush to remove dust from the surface and vents. Avoid using water or cleaning agents, as they may damage sensitive parts.
Inspect the rectifier for signs of wear or damage during cleaning. Pay close attention to connectors, cables, and terminals. Look for loose connections, corrosion, or frayed wires. If you notice any issues, address them immediately to avoid further complications.
Tip: Schedule cleaning and inspections every three to six months, depending on the environment. Dusty or industrial settings may require more frequent checks.
Monitoring Battery Health
Batteries play a critical role in your telecom power system by providing backup power during outages. Monitoring their health ensures they perform reliably when needed. Start by checking the battery voltage and charge levels using a multimeter. Compare the readings to the manufacturer's specifications to confirm they are within the acceptable range.
Look for physical signs of battery deterioration, such as swelling, leakage, or discoloration. These issues indicate that the battery may need replacement. Additionally, test the battery's capacity by performing a discharge test. This process involves temporarily disconnecting the rectifier and observing how long the battery can sustain the load.
Reminder: Replace batteries that show signs of wear or fail capacity tests. Keeping spare batteries on hand minimizes downtime during replacements.
Updating Firmware and Logs
Firmware updates improve your rectifier's functionality and security. Manufacturers release updates to address bugs, enhance performance, and add new features. Check the manufacturer's website or user manual for instructions on downloading and installing the latest firmware. Always back up your current settings before updating to avoid losing important configurations.
Maintaining accurate logs is equally important. Record details such as maintenance dates, test results, and any issues encountered. These logs help you track the rectifier's performance over time and identify recurring problems. Use a digital or physical logbook to keep this information organized and accessible.
Note: Set reminders to check for firmware updates quarterly. Regular updates ensure your rectifier operates with the latest improvements.
Troubleshooting Common Rectifier Issues
Resolving Power Interruptions
Power interruptions can disrupt your telecom system and lead to downtime. To address this, focus on maintaining the integrity of your rectifier and its supporting components. Start by inspecting the batteries. Maintenance-free batteries require regular checks to ensure they hold a charge and deliver consistent power. Integrating Low Voltage Disconnects (LLVDs) and Battery Low Voltage Disconnects (BLVDs) into your system helps protect battery health and prevents deep discharges.
Predictive maintenance techniques can also minimize interruptions. Use real-time monitoring tools to track the rectifier's performance and identify potential issues before they escalate. Data analytics can help you anticipate failures, allowing you to take proactive measures. Additionally, ensure your maintenance team receives proper training and uses high-quality components. These steps enhance reliability and reduce the risk of unexpected outages.
Addressing Overheating Problems
Overheating is a common issue that can damage your rectifier and shorten its lifespan. To prevent this, prioritize proper airflow and cooling. Check the ventilation system regularly to ensure it remains unobstructed. Dust and debris can block vents, so clean them frequently using an anti-static brush or a soft cloth.
If your rectifier operates in a high-temperature environment, consider installing additional cooling solutions like fans or air conditioning units. Monitor the internal temperature using built-in sensors or external tools. If the temperature exceeds the recommended range, investigate the cause immediately. Loose connections or overloaded circuits often contribute to overheating. Address these issues promptly to maintain optimal performance.
Fixing Alarm or Error Codes
Alarm or error codes on your rectifier's display panel indicate specific problems. Refer to the user manual to decode these messages and identify the root cause. Common issues include input voltage fluctuations, output overloads, or communication errors. Start by checking the input and output connections. Ensure all cables are secure and free from damage.
For communication errors, verify the settings on the rectifier's control panel. Incorrect configurations can trigger alarms. If the issue persists, update the firmware to resolve potential software bugs. Always document the error codes and the steps you took to fix them. This record will help you troubleshoot similar problems in the future.
Installing and maintaining an ESTEL 48V telecom rectifier requires careful planning and consistent upkeep. By following the outlined steps, you ensure reliable power delivery and extend the equipment's lifespan. Regular maintenance plays a vital role in sustaining performance. Key practices include:
Conducting routine inspections to identify wear or damage.
Using dust isolation devices to prevent debris buildup.
Analyzing operational data periodically to detect potential issues early.
Adhering to these best practices minimizes downtime and enhances system efficiency. A well-maintained rectifier not only supports uninterrupted telecom operations but also safeguards your investment for years to come.
FAQ
What is the primary function of an ESTEL 48V telecom rectifier?
The ESTEL 48V telecom rectifier converts AC power into DC power. This ensures a stable power supply for telecom equipment. It also supports uninterrupted operations during power fluctuations or outages.
How often should you clean and inspect the rectifier?
You should clean and inspect the rectifier every three to six months. Dust and debris can block airflow, reducing efficiency. Regular checks help you identify wear or damage early, ensuring the rectifier remains in optimal condition.
Can you use any battery with the rectifier?
No, you must use compatible batteries. Ensure the battery matches the rectifier's voltage and capacity requirements. High-quality rectifiers work best with batteries that meet industry standards, such as VRLA or Lithium-ion types.
What should you do if the rectifier overheats?
Check the ventilation system for obstructions. Clean dust from vents and ensure proper airflow. If the environment is too hot, consider adding fans or air conditioning. Overheating can damage the rectifier and disrupt the power supply.
Why is firmware updating important for rectifiers?
Firmware updates improve performance and security. Manufacturers release updates to fix bugs and add features. Regular updates ensure your rectifier operates efficiently and maintains a reliable power supply for your telecom systems.
See Also
Ensuring Correct Voltage Levels In Communication Cabinets By ESTEL
Telecom Cabinets Powered By Grid-Connected Inverter And Battery Systems
Ensuring A Consistent Power Supply For Telecom Cabinets
Essential Maintenance Tips For Outdoor ESTEL Telecom Cabinets
Utilizing Energy Storage Batteries In ESTEL Telecom Cabinets
CALL US DIRECTLY
86-13752765943
3A-8, SHUIWAN 1979 SQUARE (PHASE II), NO.111, TAIZI ROAD,SHUIWAN COMMUNITY, ZHAOSHANG STREET, NANSHAN DISTRICT, SHENZHEN, GUANGDONG, CHINA