ESTEL Outdoor Cabinet Air Conditioner Installation Guide
Installing your outdoor cabinet air conditioner correctly is essential not only for functionality but also for optimizing its performance. Proper installation enhances cooling efficiency, minimizes unnecessary strain, and can even prolong the lifespan of your outdoor cabinet air conditioner. For example:
Placing the unit in the right location ensures consistent cooling and effectively expels hot air.
Keeping it away from heat sources like direct sunlight reduces its workload.
Ensuring a tight seal prevents dust and moisture from entering, safeguarding the internal components.
By adhering to this guide, you'll ensure your outdoor cabinet air conditioner operates at peak performance and remains reliable for years to come.
Key Takeaways
Pick a shady spot for the outdoor unit. This helps it work better and last longer.
Check the area carefully to avoid problems like bumpy ground or air leaks.
Follow safety rules and wear safety gear to stay safe while installing.
Preparation for Air Conditioner Installation
Inspect the Installation Site
Before diving into the installation process, take a moment to inspect the site where the air conditioner will be installed. This step ensures a smooth process and prevents potential issues later. Look for a stable surface to place the outdoor unit. A wobbly or uneven area can damage the unit's internal components and lead to costly repairs.
Also, check for sealing issues or air duct leaks in the surrounding area. These can significantly impact the performance of your air conditioning system. A thorough inspection helps you avoid unnecessary energy loss and ensures the system operates efficiently.
Pro Tip: Keep the installation area clear of debris and obstacles. This not only protects the equipment but also makes the process safer and more efficient.
Choose the Ideal Location for the Outdoor Unit
Selecting the right spot for your outdoor unit placement is crucial. Choose a location that's shaded and away from direct sunlight. This reduces the workload on the air conditioner, improving its efficiency and lifespan. Avoid placing the unit near heat sources or areas with restricted airflow. Proper ventilation is key to maintaining optimal performance.
Additionally, ensure the unit is easily accessible for maintenance. You don't want to struggle every time you need to clean or service it. A well-thought-out location saves you time and effort in the long run.
Gather Necessary Tools and Materials
Having the right tools and materials on hand makes the installation process much smoother. Here's a quick checklist to help you prepare:
Benefit Type | Description |
|---|---|
Safety | Ensures you follow proper procedures, protecting both you and the system during installation. |
Quality Assurance | Helps verify that all components are installed correctly and function as intended. |
Problem Prevention | Identifies potential issues early, reducing the risk of future malfunctions. |
Post-Installation Cleanup | Keeps the worksite tidy, leaving a professional impression. |
Gather items like a drill, screws, mounting brackets, a level, and safety gear. Having everything ready ensures you won't have to pause midway to find a missing tool.
Note: Regularly update your checklist to include new tools or materials based on advancements in air conditioning installation techniques.
Step-by-Step Outdoor Unit Installation
Measure and Mark the Cabinet Dimensions
Start by measuring the dimensions of your outdoor cabinet air conditioner. Use a tape measure to get precise measurements of the unit and the cabinet where it will be installed. Mark these dimensions on the cabinet using a pencil or marker. This ensures the air conditioner fits snugly and operates efficiently.
Tip: Double-check your measurements before proceeding. A small error can lead to improper fitting, which may affect cooling performance.
Cut the Cabinet for Proper Fit
Once you've marked the dimensions, it's time to cut the cabinet. Use a jigsaw or a similar cutting tool to create the necessary openings. Make sure the cuts are clean and smooth to avoid sharp edges that could damage the air conditioner during installation.
Safety Alert: Wear protective gloves and goggles while cutting to prevent injuries.
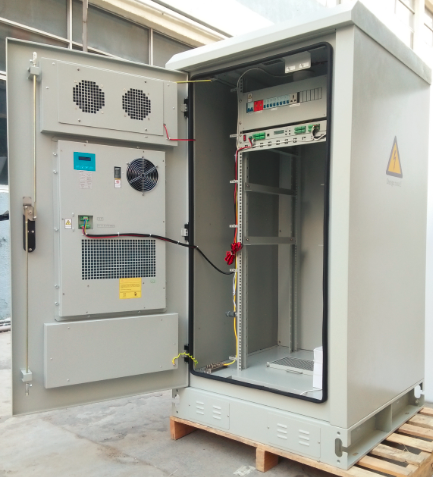
Mount the Outdoor Cabinet Air Conditioner
Position the outdoor cabinet air conditioner into the prepared opening. Secure it using mounting brackets and screws. Ensure the unit is level by using a spirit level. A properly mounted air conditioner minimizes vibrations and noise during operation.
Pro Tip: Tighten the screws evenly to distribute pressure and avoid damaging the unit.
Connect the Wiring and Electrical Components
Electrical connections are a critical part of air conditioner installation. Follow these steps to ensure safe and efficient wiring:
Turn off the circuit breaker to prevent electrical accidents.
Run an electrical cable from the service panel to a disconnect switch near the outdoor unit.
Prepare another cable to connect the disconnect switch to the air conditioner’s control panel.
Strip the insulation from the cable ends and separate the wires.
Splice wires of the same color together and secure them with wire caps.
Connect the wires to the control panel and attach the ground wire.
Reminder: Always follow local electrical codes and manufacturer guidelines to ensure compliance and safety.
Install Refrigerant Lines
Proper installation of refrigerant lines is essential for optimal air conditioner performance. Here's what you need to know:
Key Point | Description |
|---|---|
New Refrigerant Lines | Use new lines to prevent oil mixing that could damage the system. |
Flushing and Cleaning | Clean old lines thoroughly if reusing them to maintain efficiency. |
Installation of Hangers | Secure refrigerant lines with hangers to prevent movement during operation. |
Correct Fitting | Ensure the line set fits perfectly to the service valve for efficiency. |
Filter Dryer Placement | Place a filter dryer near the expansion valve to protect against moisture. |
Tip: Inspect the refrigerant lines for leaks after installation to avoid performance issues.
Set Up the Condensate Drain Line
A properly installed condensate drain line prevents water damage and ensures smooth operation. Follow these guidelines:
Place an overflow pan beneath the outdoor unit to catch excess water.
Install an auxiliary drain line from the secondary drain outlet to the overflow pan. Ensure it slopes downward for proper drainage.
Attach float switches to both primary and secondary drain lines to prevent overflow.
Insulate the drain lines to avoid condensation buildup in humid climates.
Regularly check the slope and clean the drain lines to prevent blockages.
Test the float switches periodically to ensure they're functioning correctly.
Note: Neglecting the drain line setup can lead to water damage and reduced efficiency.
Safety Considerations During Installation
When installing an outdoor cabinet air conditioner, safety should always come first. Following proper guidelines and using the right equipment can prevent accidents and ensure a smooth installation process. Let's dive into the key safety measures you need to follow.
Follow Manufacturer Guidelines
Every air conditioning installation starts with the manufacturer's instructions. These guidelines are designed to keep you safe and ensure the outdoor unit operates efficiently. Here are some essential practices to follow:
Use equipment that meets safety standards, such as UL-listed tools and materials.
Install a dedicated electrical circuit with the correct breaker size to handle the unit's power needs.
Ground the outdoor unit properly, following the National Electrical Code (NEC).
Turn off all power at the service disconnect box or electric panel before starting any work.
Comply with local building codes and NFPA standards, especially NFPA 70 and 90A/90B.
Did you know? The National Fire Protection Association (NFPA) creates globally recognized safety standards to reduce fire and electrical hazards. Following these standards during installation can help you avoid property damage and personal injury.
By sticking to these guidelines, you'll not only protect yourself but also ensure your air conditioner runs smoothly for years to come.
Use Protective Equipment
Installing an outdoor cabinet air conditioner involves handling sharp tools, heavy components, and potentially hazardous materials. Wearing the right protective gear can save you from injuries. Here's what you should have:
Gloves: Protect your hands from cuts, burns, and abrasions.
Eye Protection: Safety goggles shield your eyes from flying debris and refrigerant splashes.
Footwear: Sturdy, non-slip shoes reduce the risk of slips and falls.
Why is this important? According to workplace injury statistics, sprains, cuts, and fractures are common during installations. For example:
Sprains, strains, and tears: 2,420 cases
Cuts and lacerations: 890 cases
Fractures: 870 cases
Using protective equipment isn't just a precaution—it's a necessity. It keeps you safe and ensures you can complete the job without interruptions.
Ensure Electrical Safety Measures
Electrical work is a critical part of air conditioning installation, and it comes with its own set of risks. Taking the right precautions can prevent electrical hazards and keep your outdoor unit functioning properly. Here are some proven safety measures:
Safety Measure | Description |
|---|---|
Secure Electrical Connections | Ensure all connections are tight and the unit is grounded to prevent surges or hazards. |
Use of GFCIs | Install ground-fault circuit interrupters (GFCIs) for outdoor outlets to avoid electrical shocks. |
Regular Safety Checks | Perform routine maintenance to identify and fix potential issues before they escalate. |
Pro Tip: Always double-check your electrical connections before powering on the unit. A small mistake can lead to big problems, like short circuits or equipment failure.
By following these measures, you'll create a safer environment for both the installation process and the long-term operation of your outdoor cabinet air conditioner.
Testing and Final Checks After Installation
Power On the Air Conditioner
Once the installation is complete, it's time to power on your outdoor cabinet air conditioner. Flip the circuit breaker back on and use the control panel to start the unit. Listen for unusual noises like rattling or buzzing. These sounds could indicate loose components or improper mounting.
Check the display panel for error codes. If you see any, refer to the user manual for troubleshooting tips. Let the unit run for a few minutes to stabilize before moving on to the next step.
Pro Tip: Keep an eye on the initial startup. It's the best time to catch issues before they escalate.
Check Cooling Functionality
Testing the cooling performance ensures your air conditioner is working as intended. Use tools like a Fieldpiece STA2 to measure airflow and verify it matches the manufacturer's recommended settings. Dirty filters or coils can impact performance, so make sure they're clean before testing.
Here's a quick benchmark table to help you validate cooling functionality:
Benchmark/Method | Description |
|---|---|
Airflow Measurement | Measure initial airflow using tools like Fieldpiece STA2. |
Enthalpy Change | Check enthalpy change across the coil using Fieldpiece JL3RH. |
System Capacity Calculation | Use BTUh = 4.5 x CFM x Δh to calculate system capacity. |
Proper Installation and Evacuation | Confirm the system is installed and evacuated correctly. |
Cleaning Filters and Coils | Ensure filters and coils are clean for accurate testing. |
Airflow Adjustment | Set airflow to 400 CFM/Ton +/- 10%, as recommended. |
Static Pressure Verification | Verify static pressures are within the design range. |
Reminder: If the cooling performance doesn't meet these benchmarks, double-check the installation steps.
Inspect for Leaks or Obstructions
Leaks and blockages can disrupt your air conditioner's efficiency. Start by inspecting the condensate drain system for clogs. Clean the drain pan and check for cracks or damage. Replace air filters regularly to maintain proper airflow and prevent frozen coils.
Here's a checklist to guide your inspection:
Look for water pooling around the unit.
Check the thermostat settings to avoid coil freezing.
Inspect the drain pan for deterioration.
Schedule annual maintenance to catch potential leaks early.
Note: Regular inspections keep your outdoor cabinet air conditioner running smoothly and prevent costly repairs.
Installing your ESTEL outdoor cabinet air conditioner correctly ensures it performs efficiently and lasts longer. By following the steps in this guide, you'll avoid common mistakes and costly repairs.
Remember: Safety comes first! Always test your system after installation to guarantee it's working perfectly. You've got this!
FAQ
How do I know if my air conditioner is installed correctly?
Check for smooth operation, no unusual noises, and proper cooling. Inspect for leaks and ensure the unit is level.
Tip: Run the unit for 15 minutes to confirm functionality.
Can I install the air conditioner without professional help?
Yes, if you follow the manufacturer's instructions carefully. Use proper tools and prioritize safety during electrical and refrigerant line connections.
Reminder: Consult a professional for complex installations.
What should I do if the air conditioner isn’t cooling properly?
Inspect filters, refrigerant lines, and airflow settings. Clean dirty components and check for leaks or obstructions.
Checklist:
Clean filters
Verify refrigerant levels
Adjust airflow
Pro Tip: Regular maintenance prevents cooling issues.
See Also
Simplifying The Installation Process For ESTEL Outdoor Cabinets
Air Conditioning Solutions For Outdoor Telecom Cabinet Needs
Guidelines For Setting Up ESTEL Cabinets In Tough Environments
Benefits Of ESTEL Cooling Solutions For Industrial Cabinet Use
The Importance Of Air Conditioning In Outdoor Telecom Cabinets
CALL US DIRECTLY
86-13752765943
3A-8, SHUIWAN 1979 SQUARE (PHASE II), NO.111, TAIZI ROAD,SHUIWAN COMMUNITY, ZHAOSHANG STREET, NANSHAN DISTRICT, SHENZHEN, GUANGDONG, CHINA