How to implement integrated plug-and-play sensor solutions for high-density cabinet monitoring with Smart PDUs


You can implement integrated plug-and-play sensor solutions in five core steps: assess cabinet density, select compatible sensors and smart PDUs, deploy the hardware physically, configure network integration, and set up data collection and alerts.
High-density data centers concentrate heat and power draw into small spaces. Granular environmental and power monitoring becomes essential there. Plug-and-play sensors simplify this work. They connect directly to an intelligent rack PDU, so you avoid a separate controller and extra networking, as Raritan notes. Deployment time drops compared with manual wired sensors.
This article gives IT professionals and data center managers a practical, step-by-step roadmap. It covers compatibility checks, physical installation, and best practices for your smart pdu rollout.
Key Takeaways
Follow five steps: assess density, select sensors and PDUs, install hardware, configure network, and set up data collection.
Plug-and-play sensors connect directly to smart PDUs and save deployment time.
Check sensor compatibility and PDU capacity before you buy.
Start with a pilot cabinet to validate the setup and baseline readings.
Use dashboards and alerts to monitor temperature, humidity, and power remotely.
Plug-and-play sensors and power distribution units
What makes sensors plug-and-play
Plug-and-play sensors arrive ready to work. You plug a sensor into a dedicated port on the rack PDU, and the device announces itself to the management interface. Auto-discovery removes the address bookkeeping that manual wired sensors demand. Minimal manual configuration means you confirm the reading, not the wiring.
Connectivity follows a simple pattern. Intelligent rack PDUs carry RJ-45 sensor ports, and each port accepts a compatible probe without adapters. Capacity varies by model. Server Technology PRO4X PDUs support up to 32 sensor functions per unit through plug-and-play sensor buses, while Raritan NX1 models use wireless Zigbee 3.0 sensors with 5-year battery life, according to Deipower. That flexibility lets you match sensor count to cabinet density.
The sensor family covers more than temperature. Raritan lists temperature, humidity, airflow, air pressure, water leaks, proximity, vibration, and contact closure as common types. You choose the mix that matches your risk profile.
How a smart PDU acts as the hub
A smart PDU aggregates sensor data at the rack. It provides remote monitoring and control through a network interface, so you can check conditions and act without walking the aisle. Sunbird DCIM describes network controllers, remote power actions, environmental sensors, and SNMP trap notifications as core smart PDU functions.
Environmental monitoring sits at the center of this role. Intelligent PDUs incorporate environmental sensors to track temperature and humidity around mission-critical IT assets, per Vertiv. You avoid a separate monitoring appliance and its cabling. Alerts fire when readings cross your thresholds.
These power distribution units also feed higher-level systems. Fully monitored PDUs expose per-outlet metrics alongside sensor data, and DCIM platforms turn that stream into dashboards. The result is unified monitoring, management, and control across the cabinet. Intelligent PDU technology thus becomes the data backbone for your density strategy, not just a power strip.
Assess density and select smart PDUs
Map cabinet density and monitoring needs
Start with an inventory of each rack. Record heat load, power draw, and airflow per cabinet. Kertenelectric lists PDU current capacity, input voltage, phase configuration, outlet count, rack thermal conditions, and expected future load growth as core selection factors. Higher-power IT equipment changes a rack's electrical needs, so plan for growth rather than today's load alone.
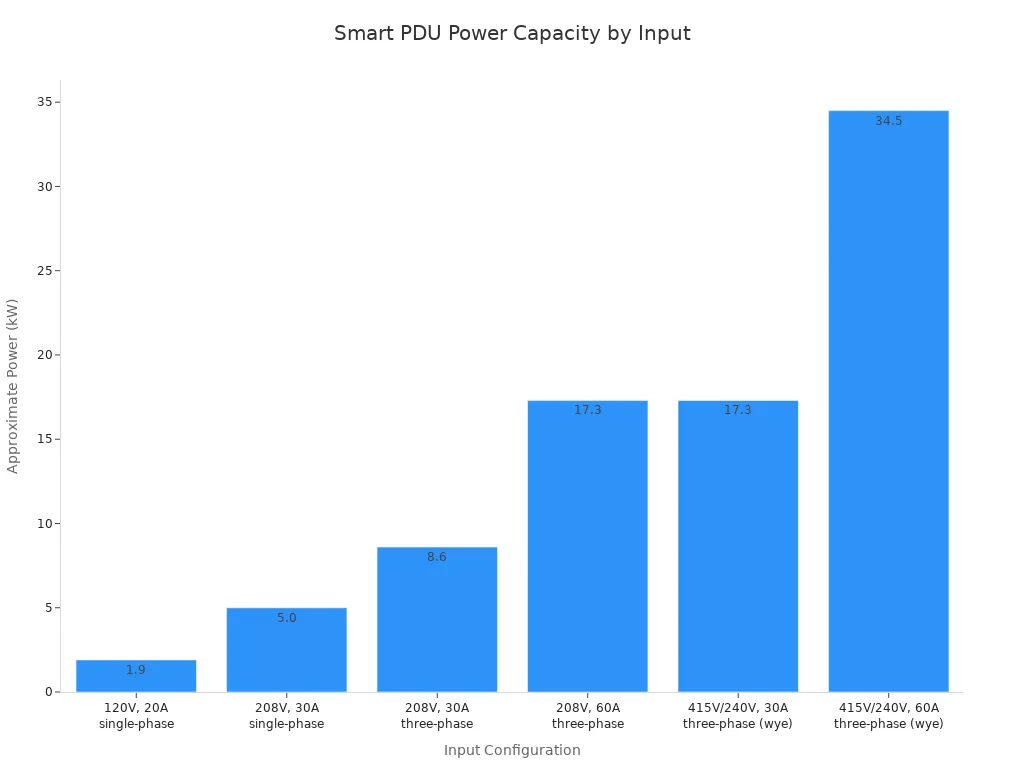
Input configuration sets the ceiling on usable power. Matrix Solutions publishes approximate capacities at 80% load and unity power factor, from about 1.9 kW on a 120V, 20A single-phase feed to roughly 34.5 kW on a 415V/240V, 60A three-phase wye feed for GPU and AI racks. The same 208V, 30A breaker delivers about 5.0 kW single-phase and about 8.6 kW three-phase. Match this capacity to your measured rack density before you order hardware.
ESTEL's Smart Power Distribution Unit suits lower-density cabinets and network closets. It offers a 16A maximum input current, 8 to 19 outlets, an LCD display, surge protection, a dehumidifying function, and an IEC60309-compliant plug system. Its dimensions are 600×450×185mm. Use it where your load profile fits this envelope.
Compatibility checks for sensors and PDUs
Check four compatibility points before purchase. First, confirm the sensor port type and the environmental sensor mix you need. Orient lists temperature, humidity, smoke, water-leak, door-contact, and airflow as common types. Second, verify protocol support and integration with your DCIM or building management system. Third, compare outlet count and connector type against your device count. IEC 60320 C13 and C19 connectors dominate rack power, per Kertenelectric, while NEMA locking types serve North American feeds. Fourth, confirm remote management features such as user permissions, event logs, and secure communication.
Vertical mounting preserves rack space in dense cabinets. A 0U power distribution unit runs along the side or rear and leaves horizontal units free for IT equipment. Weigh rack layout, cable routing, and outlet access when you choose between vertical and horizontal forms.
Install and configure the solution
Physical deployment in dense racks
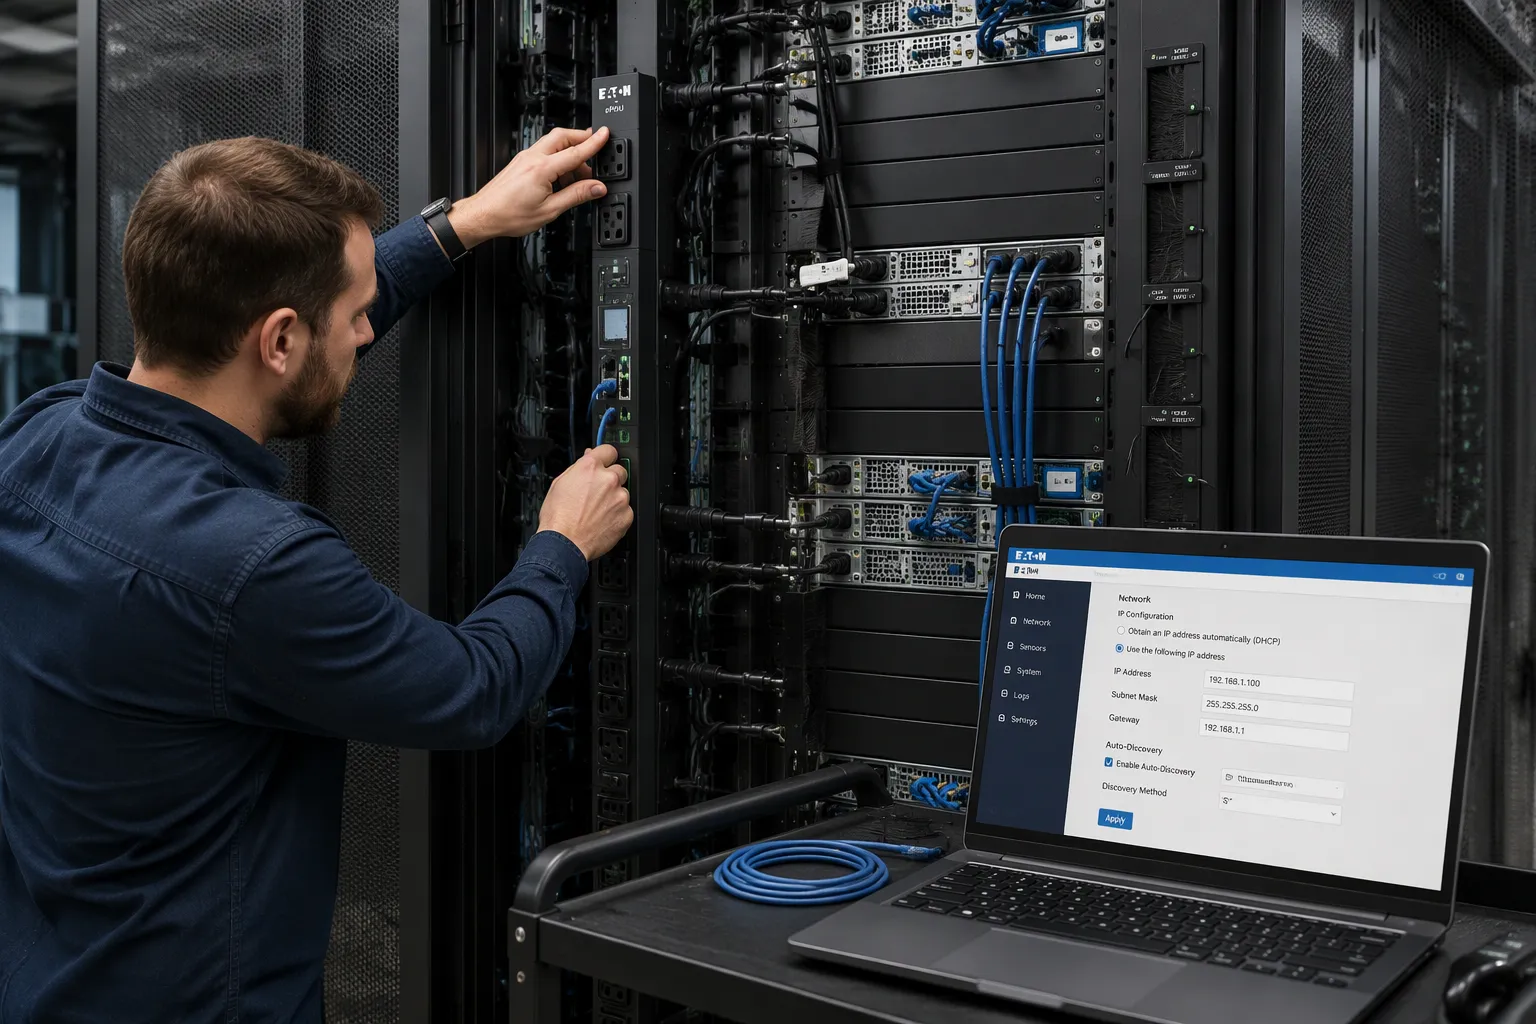
Mount the power distribution unit before you connect anything. Vertical side or bottom mounting keeps the equipment face clear, and recessed PDU cavities in cabinets preserve usable U space, per Metanet Hosting. ESTEL's Smart Power Distribution Unit measures 600×450×185mm, so confirm the cavity depth before you drill or clip. Connect the IEC60309-compliant plug system to your rack feed, then check that the 16A input rating matches the branch circuit protection.
Cable routing decides whether your dense rack breathes. Gaw Technology recommends these practices:
Use 0U vertical PDUs instead of 2U horizontal bars. A horizontal unit steals front airflow space, while a tool-less 0U model mounts in the rear raceway and frees the intake.
Keep cables out of the plenum. Route power on one side and data on the other, and bundle with Velcro rather than zip ties.
Deploy racks with factory-installed vertical ladder channels so cables never spill into fan discharge zones.
Seal bypass paths with brush grommets or foam blocks, and fit blanking panels in every empty U slot.
Leave 1U or 2U of space between high-heat devices, and follow the AVIXA Rack Building Standards for layout guidance.
Route sensor cables along the same vertical managers. Keep bend radius protection intact and label each probe, so a later move does not pull a temperature sensor out of position.
Network setup and auto-discovery
Give each smart pdu an address before you enable monitoring. NBYOSUN describes several assignment methods, and the table below shows where each one fits.
Configuration aspect | Method | Where it fits |
|---|---|---|
IP assignment | DHCP-based auto-configuration | Reduces human error and saves time versus manual entry |
IP assignment | USB-based rapid configuration | Applies a saved file with no network connection during setup |
IP assignment | Centralized management software | Pushes settings to many units from one interface |
IP assignment | Web interface or CLI | Handles single-unit setup or scripted deployment |
Turn on remote management next. Use encrypted protocols such as HTTPS, SNMPv3, or SSH, restrict access through firewalls, assign user roles, and change default credentials immediately. Schedule firmware checks on a regular cadence.
Then verify sensor auto-discovery. Confirm each probe appears in the management interface, and cross-check its reading against the LCD display on the unit. Compare sensor data with an external measurement to confirm accuracy. Use ping or traceroute to prove each device answers on its assigned address. Trigger a test alert by simulating a temperature spike, and confirm the notification reaches the right recipient. This integration step closes the loop between hardware and your monitoring platform.
Integrate data and optimize monitoring
Dashboards, alerts, and DCIM integration
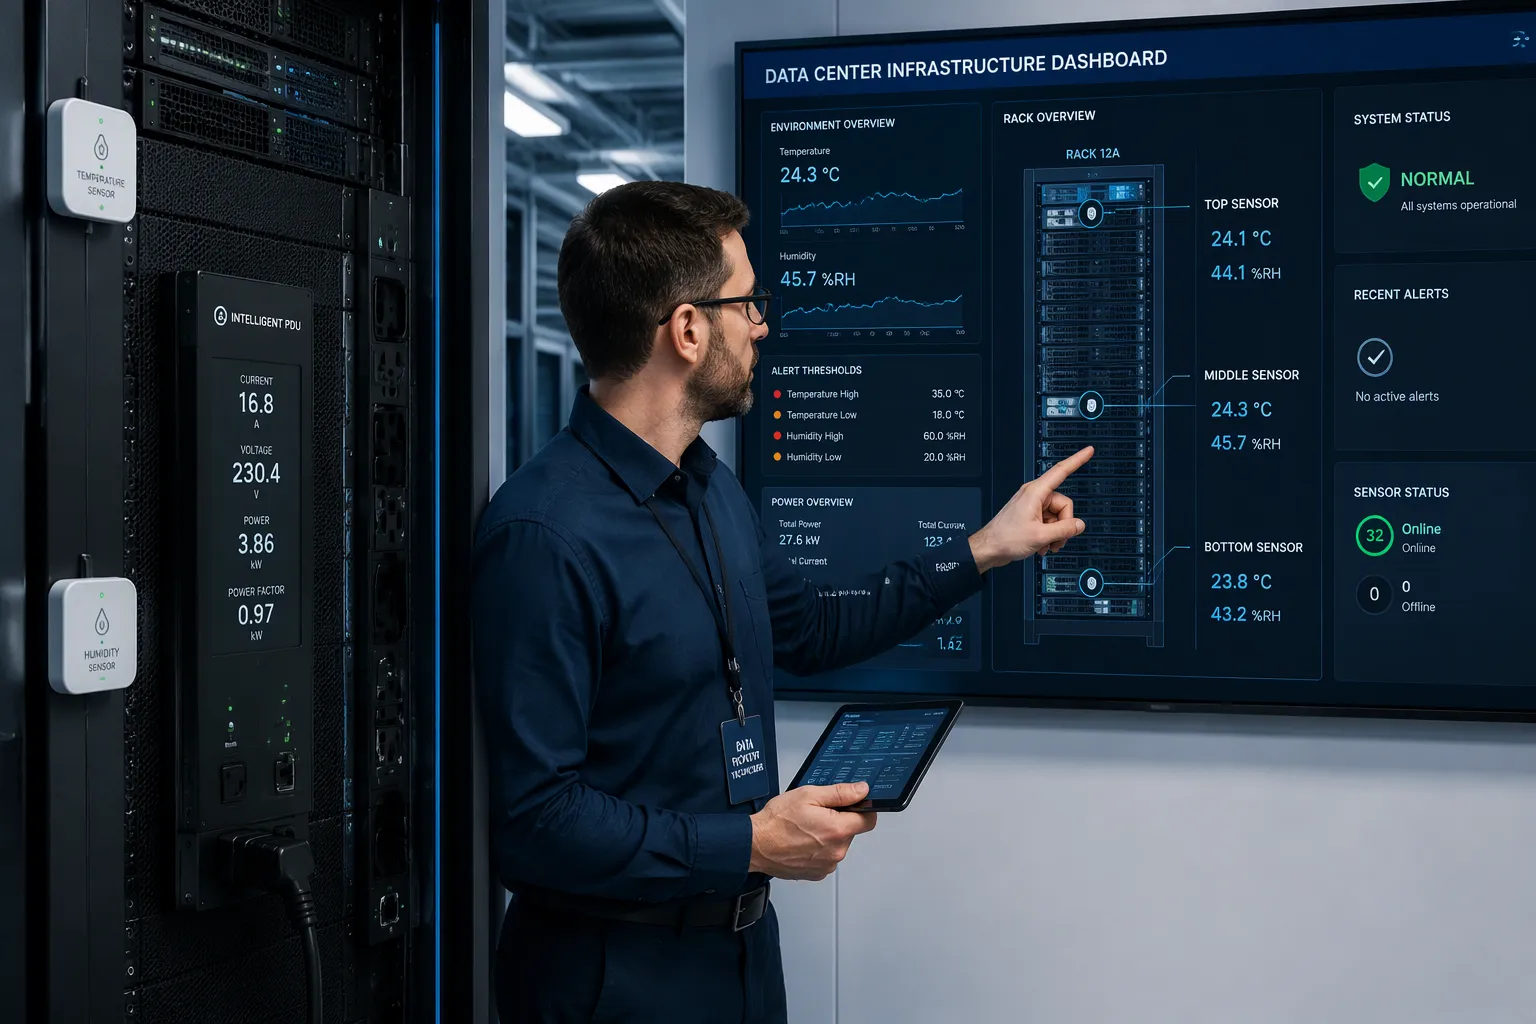
Set thresholds before you trust any dashboard. ASHRAE recommends an equipment-inlet range of 18°C to 27°C (64.4°F to 80.6°F) for classes A1–A4, per DPS Tele. Humidity should stay between 40% and 60% relative humidity under normal conditions. Below 40%, electrostatic discharge becomes a risk. Above 60%, corrosion can appear when airborne pollutants are present.
Build a tiered alert structure. DPS Tele suggests a warning at 25°C or 19°C and at 40% or 60% humidity. A critical alert fires above 27°C and below 30% or above 70% humidity. Dataspan adds that ASHRAE sets a minimum humidity of 20% and a maximum of 80%, with 50% as the goal. Environments with high silver and copper corrosion should keep upper moisture below 60%. Watch the rate of change too. ASHRAE limits temperature movement to 20°C per hour and no more than 5°C in any 15-minute window, per DPS Tele.
Place sensors where they see the air that matters. ASHRAE recommends six sensors per rack, at the top, middle, and bottom of both the front and back, according to Packet Power. Dew point often tracks moisture content better than relative humidity, and Ubibot notes that ASHRAE treats it as a practical moisture-control metric.
Power deserves equal attention. The Uptime Institute names power as the leading cause of impactful outages, most often from UPS failures, per DPS Tele. Monitor voltage, current, power factor, and UPS status. Add power metrics such as harmonic distortion and voltage dip or swell. Tractian defines a sag as a drop to between 10% and 90% of nominal lasting half a cycle to one minute, and IEEE 519 limits voltage THD to 5% at most industrial buses. IEC 61000-4-30 Class A sets the measurement method for legally defensible data.
Then connect the stream to data center infrastructure management (DCIM) software. Green4T explains that an intelligent rack PDU measures power consumption, current, and load by phase and circuit, while DCIM unifies power, assets, capacity, and environmental conditions. Smart power distribution units stream real-time power data into that platform. Plan your DCIM integration early. Check protocol compatibility, metering granularity, reporting by rack or cost center, and scalability before you commit. Confirm your smart pdu reports at the granularity you need. This integration turns raw readings into load visibility and supports capacity planning.
Best practices for high-density cabinets
Start with a pilot cabinet. Load it fully and test the complete workflow, not just sensor readings. Confirm that each event reaches the right recipient and stays repeatable under daily conditions. Set measurable acceptance criteria before the pilot begins. Document the approved configuration and train your team on the procedures.
Baseline normal readings next. Record temperature, humidity, and power for a representative period, then compare new sensors against a trusted reference. Validate accuracy before you scale. Roll out gradually, cabinet by cabinet, and revisit thresholds as you learn. Continuous monitoring closes the loop.
Use the dehumidifying function on ESTEL's Smart Power Distribution Unit in humid environments. It helps hold cabinet conditions steady where moisture risk runs high. Pair that with real-time alerts and analytics, and you gain real-time energy optimization across the fleet. Good power management starts with clean data and grows with each cabinet you add.
You now have a complete implementation path. Assess cabinet density first. Select compatible sensors and smart pdus next. Then install the hardware, configure network integration, and set up data collection. Finish by optimizing alerts and dashboards.
Plug-and-play sensors paired with smart PDUs shorten deployment time. They also improve visibility inside high-density cabinets. You see temperature, humidity, and power conditions without extra controllers or complex wiring.
Begin with a pilot cabinet. Validate compatibility there, for example with ESTEL's Smart Power Distribution Unit. Confirm sensor discovery and accurate readings before you expand. Scale to more cabinets once you establish monitoring baselines. Each added rack then builds on proven, repeatable results.
FAQ
How do plug-and-play sensors connect to a smart PDU?
You plug each sensor into a dedicated RJ-45 sensor port on the intelligent rack PDU. The unit discovers the probe automatically and reports its reading in the management interface. You confirm the value rather than configure the wiring, which keeps installation fast in dense cabinets.
How many outlets do you need per cabinet?
Count every device you plan to power, then add headroom for growth. ESTEL's Smart Power Distribution Unit offers configurations from 8 to 19 outlets. Match the outlet count and connector type to your actual device inventory before you order.
Can you monitor the cabinet without visiting the aisle?
Yes. A smart PDU provides remote monitoring and control through its network interface. You check temperature, humidity, and power readings from a dashboard, and alerts reach you when conditions cross your thresholds. Confirm remote management is enabled during setup.
What does the dehumidifying function do?
The dehumidifying function on ESTEL's Smart Power Distribution Unit helps hold cabinet conditions steady where moisture risk runs high. Pair it with humidity alerts so you catch rising moisture early. Keep readings inside your ASHRAE-based thresholds.
Should you deploy sensors across every cabinet at once?
No. Start with one pilot cabinet and baseline its normal temperature, humidity, and power readings. Validate sensor accuracy against a trusted reference there. Scale to more cabinets only after the workflow proves repeatable and your thresholds hold up.
See Also
Guide to Installing and Maintaining Smoke Sensors in Communication Cabinets
Understanding ESTEL PDUs and Their Function in Data Center Cabinets
Enhancing Outdoor Cabinets with Power, Cooling, and Monitoring Solutions
Strategies to Achieve Optimal Monitoring for Outdoor Telecom Cabinets
Simple Approaches to Organizing Cables in Data Center Cabinets
CALL US DIRECTLY
86-13752765943
3A-8, SHUIWAN 1979 SQUARE (PHASE II), NO.111, TAIZI ROAD,SHUIWAN COMMUNITY, ZHAOSHANG STREET, NANSHAN DISTRICT, SHENZHEN, GUANGDONG, CHINA
